

| Version 82 (modified by , 8 years ago) ( diff ) |
|---|
WIP to reflect the changes from #8039 (and #10456).
Languages:
Table of Contents
Layers window
 Keyboard shortcut:
 Shift+Alt+L — one of the JOSM windows
The Layers panel lists the loaded layers, controls their visibility and activates them for editing content.
Layer types
JOSM has several types of layers.
 Data layer -
Holds a set of map data objects.
These can be edited, up- and downloaded unless the layer state is
Data layer -
Holds a set of map data objects.
These can be edited, up- and downloaded unless the layer state is  changed or
  locked.
A
locked.
A  clock indicates an running upload.
 GPX layer -
Holds GPS track data.
Each GPX layer can have own properties like color, line style, etc.
GPX layer -
Holds GPS track data.
Each GPX layer can have own properties like color, line style, etc.
 Marker Layer -
Holds identified points on a GPX track, called Markers.
They are created in four varieties:
Named, Audio, Image and Web.
Marker Layer -
Holds identified points on a GPX track, called Markers.
They are created in four varieties:
Named, Audio, Image and Web.
 Geoimage layer -
Holds images which were opened, dragged on the Mapview or imported via a GPX layer.
Geoimage layer -
Holds images which were opened, dragged on the Mapview or imported via a GPX layer.
 Imagery Layer -
Holds a background retrieved from a tile server like Bing Aerial or other imagery.
Imagery Layer -
Holds a background retrieved from a tile server like Bing Aerial or other imagery.
 Validator layer -
Highlights errors or warnings for objects on the active data layer.
Validator layer -
Highlights errors or warnings for objects on the active data layer.
 Notes layer -
Holds Notes from OSM.
Notes layer -
Holds Notes from OSM.
Layers of one type can exist multiple times in a JOSM session, except the validator and the notes layer.
More layer types come with additional plugins, e.g.  Mapillary plugin.

Layer Buttons

| Make this layer the active layer |
| Snap/unsnap the map zoom to the native resolution of this background imagery | |

| Hide/unhide the layer |
Panel Buttons
The Layers window also has several buttons at the bottom which operate on the selected layers:
Move Up
![]() Up moves the selected layers up one row in the layer stack.
Up moves the selected layers up one row in the layer stack.
This is important when items in one layer obscure those in layers below. You can reorder layers also by drag and drop.
Move Down
![]() Down moves the selected layers down one row in the layer stack.
Down moves the selected layers down one row in the layer stack.
Activate Layer
 Keyboard shortcut:
 Shift+A⤳[0–9] - counting from the top
Activate activates the selected layer.
It is only possible to edit in an active Data layer.
Visibility
 Following hotkeys used to control visibility of top10 or bottom10 layers:
Shift+S⤳[0–9]- where 0 is the top layer; counting down to 9Alt+[1–0]- where 1 is the bottom layer; counting up to 0
Once clicked on, it offers:
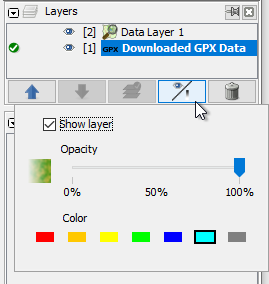
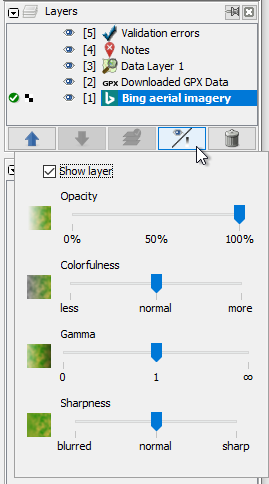
- A checkbox to show/hide a layer, i.e. turns visibility of selected layers on or off. The layers are unchanged when hidden, but their contents are not shown. You can also use the following shortcuts to show/hide a layer:
- A slider to adjust the
 Opacity of selected layers.
- A slider to adjust the
 Colorfulness of selected layers.
- A slider to adjust the
 Gamma of selected layers.
- A slider to adjust the
 Sharpness of selected layers.
Colorfulness, Gamma and Sharpness are only availible for imagery layers.
For gpx layers you can choose one of 7 default colors. (Other colors are available via Customize Color in the gpx layer context menu).

Note: For ease of use you can use mouse scrolling to move a slider while the pointer is placed at the slider – no need to click-drag-release the slider picker.
Delete Layer
![]() Delete permanently deletes the selected layers. All unsaved changes will be discarded!
Delete permanently deletes the selected layers. All unsaved changes will be discarded!
If you try to delete an OSM data layer or Notes layer which contains changes, JOSM will open the Unsaved Changes window, asking to upload and/or save these changes.
Individual Buttons
There might be more buttons depending on the loaded plugins, e.g. ![]() RasterFilters plugin.
RasterFilters plugin.
Attachments (2)
- gpx_colors.png (11.1 KB ) - added by 7 years ago.
- LayerList.png (20.9 KB ) - added by 7 years ago.
Download all attachments as: .zip