

| Version 57 (modified by , 12 years ago) ( diff ) |
|---|
This page needs some more links to help pages. Also icons should be displayed instead of describing them. (Example: "The 8th button on the left (an icon with a wrench over a document)")
Languages:
Table of Contents
Introduction to JOSM
Terminology
- Node
- A node is a point.
- Way
- A way is a line connecting multiple nodes. Way, therefore, is a general term for series of joined nodes, not just for roads or ways in reality.
- Relation
- A relation is an ordered sequence of ways and nodes, a logical container used to group elements.
- Area
- An area is a way whose ends are connected.
- Tag
- Tags describe what each node or way represents. Tags are organized into "keys" and "values." Keys are basically larger categories, such as "Highway" or "Land Use," while values are specific features, such as "Primary Road" or "Residential Street," and "Residential" or "Retail" land use.
Have a look at Objects - The basic building blocks of OSM data and maps for more information.
If a road or track or path is curved, the curve is approximated using a number of nodes within a way, and short lines connecting them. If a way has a direction, that is indicated partly by using tags. For example, "oneway=yes" is a road that goes only in one direction. (See Conventions in "Creating certain types of ways" at the bottom of this page for special considerations when creating a one-way road.) Other tags refer to being on the left and right of the direction of way along the way.
Starting JOSM
JOSM is a Java program, and comes in a .jar file. If you don't know how to start it, ask someone familiar with your platform how to run a Java program. You might also want to read the install notes.
When JOSM starts, it presents you with a few messages about recent changes in JOSM. You should have a look at this page from time to time as it keeps you informed on some of the more interesting changes.
The next step is to download some data. If you have a GPX file (downloaded from your GPS receiver) for the area of interest, load it into JOSM using (File/Open). JOSM will display the area of the GPX file.
Next, add data for that area from openstreetmap.org. Open the download dialog by clicking on the green down arrow in the top tool bar or through the file menu. To select the area to download, first click on the "Slippy Map" tab at the top of the screen. A map of the world appears. To move around the map and select the specific area you want to download, there are several tools: Click with the right mouse button to drag the map, use the scroll wheel to zoom in and out, and click with the left mouse button to define an area. Then, click on the green down arrow ![]() to fetch the data from openstreetmap.org.
to fetch the data from openstreetmap.org.
An alternative is to download existing GPX points from the OSM server. In order to start this process you will need to know the latitude and longitude coordinates of the relevant area. The easiest way to do this is to use the download dialogues slippy map in the first tab. Read more on the download dialogue.
Editing in JOSM
JOSM is an offline editor which means everything you do won't be visible for anyone else until uploading it to the server. This makes it possible to experiment and repeatedly moving, tagging, adding and deleting elements without breaking anything. Subsequent actions on a single element will go into the database as a single modification when uploaded.
Adding a Node or a Way
The first step of actual editing is to add a node or way to the OSM data. You can add standalone nodes or you can add nodes to ways, especially where there is a junction between two ways or a significant change in direction of the way.
To add a node, highlight the "Node" button, either by clicking the 2nd button in the left menu bar, or by hitting the "A" key on the keyboard (the 2nd button should then be highlighted). Then, move the mouse cursor over where you want the node, over a way or over your GPS track (if you uploaded one) and left click wherever you want a node. A white dot (a selected node) should appear and a rubber-line span from that dot to the mouse cursor. If you create subsequent nodes, the earlier nodes will be shown as yellow dots.
A series of joined nodes forms a way.
Adding Tags
Ways or nodes on their own are not of much use unless they are tagged to say what they represent. The Map Features web page Map Features shows and explains the most used tags that could be used on a point or way.
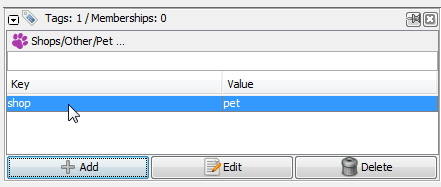
The first step in adding tags is to be sure the Tags/Membership Dialog is open on the right hand side of JOSM. The ![]() button on the left should be highlighted. If it is not highlighted, click on it or hit
button on the left should be highlighted. If it is not highlighted, click on it or hit Alt+Shift+P. You will see the Tags/Membership Dialog, which has three buttons: ![]() Add,
Add, ![]() Edit and
Edit and ![]() Delete.
Delete.
To edit the properties of a node or way (such as adding a tag) in the Tags/Membership Dialog, the way or node must be selected.
- Enter Select mode by clicking on
 of the left-hand icons or hitting the
 Skey. - Highlight the way or point you wish to select. Click the
 Add button.
- A dialog box will appear, and you will be asked to select a key and a value for each tag. Type in the key/value pair that represents the tag you are creating. For example, for the key, you might type "highway," and for the value "secondary" (no quotes).
- Click OK. You have now tagged your way. You can add several tags to one object.
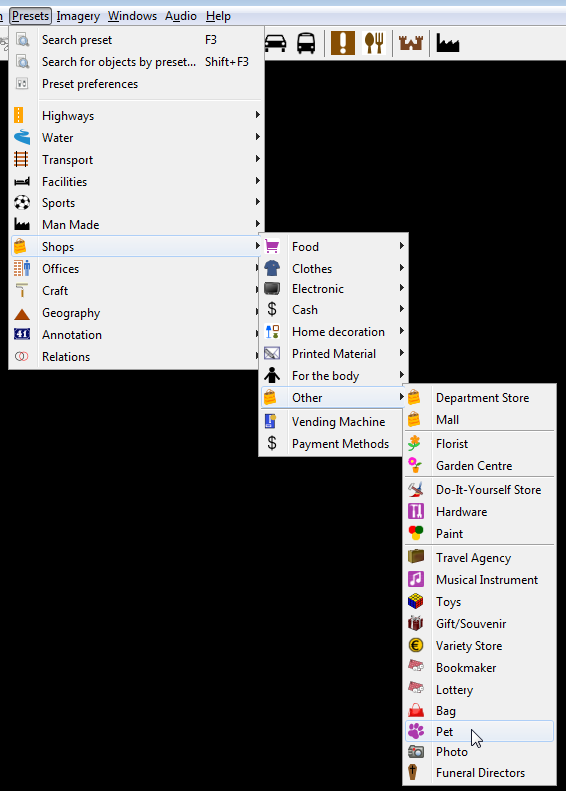
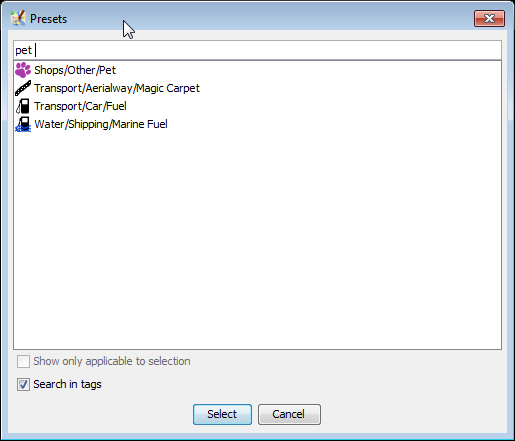
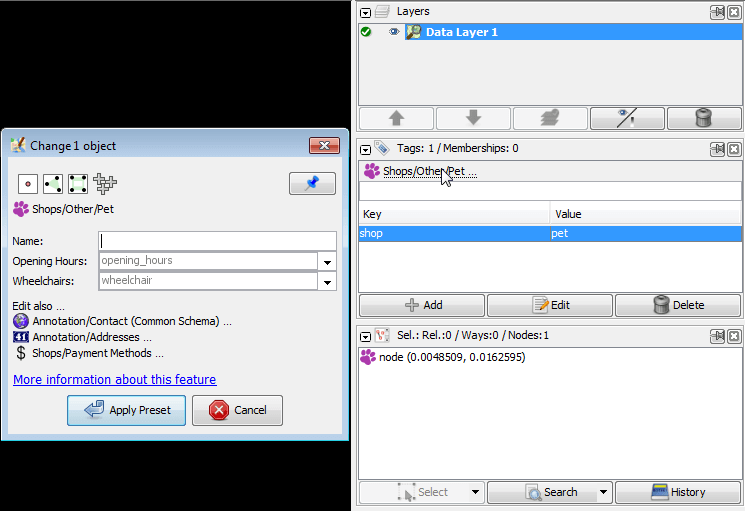
Instead of adding tags manually you can also use Presets.
Uploading to OSM
If you are happy with all that you have done then you must upload your work to the OSM server. Click on the green up arrow ![]() .
.
JOSM will give you an overview of the elements that it is about to upload. You will be asked to provide a short text summary of your edits. This description will be saved with your data on the server and provides information, for example, for the Recent Changes list.
Click on "Upload changes" and your data will be uploaded, saved and visible to everyone else.
See Upload to OSM for further information on uploading.
Conventions in Creating Certain Types of Ways
A couple of other points about creating ways.
- Dual-carriage ways (divided roads such as motorways, interstate highways, etc.) should be drawn as two separate parallel ways, with each carriage way being a different direction.
- If a street is one-way (including the individual carriage ways of a dual-carriage way), that way should be drawn in the direction of travel.
- Key-and-value tagging is case sensitive. All keys should be entered in lower case.
Back to Main Help
Attachments (10)
-
download-data.gif
(654.3 KB
) - added by 10 years ago.
https://github.com/mapbox/mapping/wiki/Getting-started https://github.com/mapbox/mapping/issues/162
-
poi-restourant.gif
(403.8 KB
) - added by 10 years ago.
https://github.com/mapbox/mapping/wiki/Mapping%20Common%20Features#simple-point-of-interest https://github.com/mapbox/mapping/issues/162
- poi-fountain.gif (142.8 KB ) - added by 10 years ago.
-
enable-imagery.gif
(2.3 MB
) - added by 10 years ago.
https://github.com/mapbox/mapping/wiki/Mapping-with-JOSM#using-imagery https://github.com/mapbox/mapping/issues/162
-
uploading data.gif
(668.8 KB
) - added by 10 years ago.
https://github.com/mapbox/mapping/wiki/Mapping-with-JOSM#uploading-to-openstreetmap https://github.com/mapbox/mapping/issues/162
- presets-from-main-menu.png (53.1 KB ) - added by 10 years ago.
- presets-f3-search.png (13.2 KB ) - added by 10 years ago.
- presets-in-tag-toggle.png (10.5 KB ) - added by 10 years ago.
- single-preset-shown-in-context-of-tagsmemberships-single-object.png (17.9 KB ) - added by 10 years ago.
-
Kapture 2025-06-01 at 12.43.31 2.gif
(4.3 MB
) - added by 12 months ago.
Logging in, selecting map, downloading data