

Languages:
Plugin -> Turn Restrictions
![]()
Introduction
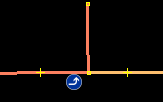
In OpenStreetMap a turn restriction limits navigation options. It represents the restriction that one cannot navigate from a way to another way. For instance, the turn restriction depicted below forbids to drive straight. Vehicles have to turn left at the junction where the two ways meet (the so called via-node). Turn restrictions are important for routing and navigation software which are based on OSM data.
The turnrestrictions plugin supports editing of turn restrictions. It consists of two major components:
- Turn Restriction Panel - the turn restrictions panel is displayed on the right in sidebar. It displays the list of turn restrictions in the current data set and allows to create or delete turn restrictions, or to launch the Turn Restriction Editor to edit a turn restriction.
- Turn Restriction Editor (
Alt+Shift+2) - the Turn Restriction Editor is a special purpose editor for turn restrictions.
Tagging model
Turn restrictions a standard map feature decribed on the OSM wiki.
Technically, a turn restriction is an OSM relation. A turn restriction
- must have a relation member with role
fromreferring to a way. We call this way the from-way. - must have a relation member with role
toreferring to a way. We call this way the to-way. - must have at least one relation member with role
viareferring to a node or way. We call these objects via-object.
Use Cases
Creating a turn restriction
There are several possibilities to create a new turn restriction. First, you can lauch the Turn Restriction Editor for a new turn restriction from the Turn Restriction Panel:
- Click on
 in the Turn Restriction Panel. Alternatively, select New from the popup menu.
Alternatively, you can launch a new editor with a keyboard shortcut:
- Press the shortcut for creating or editing a turn restriction. On most platforms the shortcut is
Alt+Shift+2. - If objects in the current JOSM selection already participate in a turn restriction, the following window pops up.

Just click onNor hitEnter.
In both cases, the turnrestrictions plugin initializes the new turn restriction with objects from the current JOSM selection:
- The first selected way in the JOSM selection becomes the from-way.
- The last selected way in the JOSM selection becomes the to-way
- If the from- and to-way have a node in common, this node becomes a via-object.
A fast way to create a turn restriction is therefore to
- Select the from- and to-way in JOSM
- Press
Alt+Shift+2 - Choose the type of the turn restriction and save it.
Editing a turn restriction
There are several possible ways to launch a Turn Restriction Editor in order to edit a turn restriction. First, you can lauch the Turn Restriction Editor for an existing turn restriction from the Turn Restriction Panel:
- Select a turn restriction in the Turn Restriction Panel
- Click on
 . Alternatively, select Edit from the popup menu.
Second, you can launch a new editor with a keyboard shortcut:
- Press the shortcut for creating or editing a turn restriction. On most platforms the shortcut is
Alt+Shift+2. - If objects in the current JOSM selection already participate in a turn restriction, the following window pops up.
Just double-click on the turn restriction you want to edit. Alternatively, for the top 9 turn restrictions displayed in the popup window you can use the shortcuts 1 to 9 to launch the Turn Restriction Editor. In the example above, you would press 1 to start editing.
A fast way to edit a turn restriction is therefore to
- Select the from- or to-way in JOSM
- Press
Alt+Shift+2 - Type
1to launch the Turn Restriction Editor
Deleting a turn restriction
There are several possible ways to delete a turn restriction. First, you can delete it in the Turn Restriction Panel:
- Select a turn restriction in the Turn Restriction Panel
- Press
DELor click on . Alternatively, select Delete from the popup menu.
Alternatively, you can launch a Turn Restriction Editor and click on ![]() in its toolbar.
in its toolbar.
Turn Restriction Panel
The Turn Restriction Panel helps you to keep track of the turn restrictions in the current edit layer.
Here's a screenshot of the panel and its popup menu:

If you tick the checkbox Only participating in selection the dialog displays only turn restrictions in which objects from the current selection are participating. If the checkbox isn't selected, then all turn restrictions in the current edit layer are displayed.
You can apply some commands to the turn restrictions displayed in this dialog.
| Command | Description |
|---|---|
| Create a new turn restriction | Click |
| Edit a turn restriction | Select the turn restriction and click |
| Delete a turn restriction | Select one or more turn restrictions, press DEL, or click on |
| Select the turn restriction | In order to select the turn restriction and its members in the current edit layer, first select the turn restriction in the list and then select |
| Zoom to the turn restriction | Select the turn restriction in the list and then select |
Turn Restriction Editor
The Turn Restriction Editor allows you to create and edit turn restriction. It provides two user interfaces:
- a Basic Editor. This is a special purpose user interface for editing the properties of a turn restriction.
- an Advanced Editor. This is a generic user interface for editing the raw data elements of the OSM relation which represents a turn restriction.
You can use either of these user interfaces. Regardless of whether you use the Basic Editor or the Advanced Editor you should make sure that the resulting turn restriction is valid. The turn restriction editor checks the turn restriction and shows error messages and warnings in a third user interface, i.e. the list of issues.
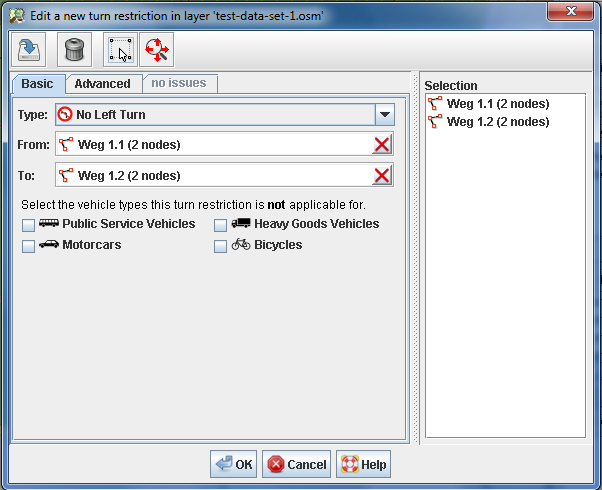
Basic Editor
The Basic Editor allows you to set the from-way, the to-way, and exceptions to the turn restriction for a selection of vehicle types.
In order to set the from-way
- Select a way in the current edit layer
- Drag it from the list of selected objects (on the left in the editor) onto the input field From:
Alternatively, you can
- Select a way in the current edit layer
- Copy it (using
Ctrl+Cor Copy in the popup menu) in the list of selected objects on the right of the Turn Restriction Editor
- Click on the From: field and paste the copied way (using
Ctrl+Vor Paste from the popup menu)
In the standard configuration, via-objects aren't displayed in the Basic Editor. You have to switch to the Advanced Editor to edit them. In the preferences for the turnrestrictions plugin you can change the default configuration, though. Launch the preference dialog and enable displaying/editing of via-objects in the Basic Editor.
The following screen shot shows the Basic Editor configured to display/edit via-objects too.

Advanced Editor
The Advanced Editor allows you to edit the raw OSM data, i.e. the tags and the relation members of the relation representing the turn restriction.

Editing the tags
In the upper half of the Advanced Editor you can edit the tags of the turn restriction. You can add tags with arbitrary keys and values but please note that some tags have a special meaning in turn restrictions:
type=restriction- this is a required tag for a turn restriction.restriction=...- the value of this tag should be one of the supported types for turn restrictions. Instead of editing the raw tag value you can also select a restriction type from the drop-down box in the Basic Editor.except=...- the value of this tag should be a set of supported vehicle types. Instead of editing the raw tag value you can also tick the respective vehicle types in the Basic Editor.- (
day_on=...,day_off=...,hour_on=...andhour_off=...can be used to specify when a turn restriction is actually in place, refer to the OSM wiki for more information.) Deprecated, please use conditional restrictions instead.
Editing the members
In the lower half of the Advanced Editor you can edit the members of the turn restriction relation.
In addition to the from-way and the to-way, which you can edit in the Basic Editor too, you can also enter via-objects. (The role location_hint is deprecated as it is not verifiable on the ground).
To add members just drag-and-drop or copy/paste objects from the JOSM selection view on the right to the list of relation members.
You can reorder the relation members:
- Select one or more members
- Press Alt-Up to move them up by one position. Alternatively you can select Move up from the popup menu.
Press Alt-Down to move them down by one position. Alternatively you can select Move down from the popup menu.
To edit the role of a relation member
- Double-click on the table cell with the role
- Edit the role and press ENTER
Resolving Errors and Warnings

Preferences
To launch the preferences panel for the turnrestrictions plugin:
- Click on
 in the JOSM toolbar or press
 F10. - Click on
 to display the preferences panel for the turnrestrictions plugin

Select icon set for road signs
The turnrestrictions plugin uses one of two icon sets for the type of turn restrictions. In the preferences panel you can configure which icon set should be used, see screenshot above.
Toggle editing of via-objects in the Basic Editor
Most turn restrictions entered in OSM have a simple structure. They restrict navigation from one way to another where the two ways have exactly one node in common. This node becomes the only via-object in the turn restriction. In most cases it isn't necessary to display and/or edit it in the Basic Editor. In order to keep simple things simple, the default configuration is therefore not to show via-objects in the Basic Editor.
You can override the standard setting, though. If you tick the respective checkbox in the preferences (see screen shot above) the list of via-objects is displayed in the Basic Editor too.
See also
- Turnrestriction Plugin page - Historic reference, development of this plugin in 2010-03 was sponsored by skobbler GmbH
Back to Plugin Help
Back to Main Help
Attachments (10)
- only_left_turn_sample.png (1.6 KB ) - added by 16 years ago.
- create-turn-restriction-popup.png (6.1 KB ) - added by 16 years ago.
- toggle-dialog-screenshot.png (40.3 KB ) - added by 16 years ago.
- sample-screen-shot.png (54.1 KB ) - added by 16 years ago.
- sample-screen-shot-2.png (64.8 KB ) - added by 16 years ago.
- sample-screen-shot-3.png (60.8 KB ) - added by 16 years ago.
- sample-screen-shot-1.png (67.5 KB ) - added by 16 years ago.
- turnrestrictions.png (4.3 KB ) - added by 16 years ago.
- basic-editor-with-vias.png (20.4 KB ) - added by 16 years ago.
- preferences-screen-shot.png (115.7 KB ) - added by 16 years ago.
Download all attachments as: .zip