

| Version 1 (modified by , 15 years ago) ( diff ) |
|---|
Revision parameter missing. Current base revision is 56
Altres idiomas:
Preferencias > Ajustes de Conexión
La dirección URL del servidor de OSM
Subir y descargar en el servidor por defecto

La mayoría de los usuarios de JOSM desean intercambiar datos geográficos con el servidor de OSM estándar operado por la comunidad de OSM.
Marque la casilla correspondiente con el fin de descargar y subir en el servidor estándar (ver imagen superior). Esta es la configuración por defecto.
Opción avanzada: Descargar y subir a un servidor personalizado
Algunos usuarios de JOSM necesitan configurar la dirección URL de la API de un servidor de OSM porque están trabajando con un servidor personalizado:
- Algunos usuarios están trabajando con las instalaciones locales del servidor de OSM
- Algunos usuarios están trabajando con instancias de desarrollo y de pruebas del servidor de OSM (por ejemplo, con http://api06.dev.openstreetmap.org).
Para utilizar una URL personalizada:
- Quitar la marca de la casilla de verificación de dirección URL de la API estándar (ver imagen superior)
- Introduzca la dirección URL de la API
Haga clic en Validar para comprobar si un servidor de la API de OSM está disponible en la URL. Si es así, JOSM mostrará el icono  a la derecha de la caja de texto para la dirección URL de la API. Si la dirección no es válida, JOSM mostrará el icono
  .
.
Preferencias de Autenticación
Trabajo de forma anónima o con una cuenta de OSM
No es necesario identificarse y autenticarse siempre y cuando no suba datos al servidor de OSM ni descargue datos para lo cual debe autenticarse primero.
Si usted trabaja de forma anónima se le permite
- para descargar datos geográficos desde el servidor de OSM y guardarlos en un archivo local
- para descargar las trazas públicas de GPS desde el servidor de OSM
- para cargar datos geográficos desde un archivo, editarlo y volver a guardarlo en un archivo
Sin embargo, no puede
- subir datos geográficos al servidor de OSM. No se pueden crear, actualizar, o cerrar cualquier conjunto de cambios.
- descargar sus trazas privados de GPS
Se recomienda crear una cuenta de usuario de OSM. Al utilizar este formulario, usted puede elegir un nombre de usuario de OSM y una contraseña de OSM, ambos de los cuales se van a utilizar a continuación.
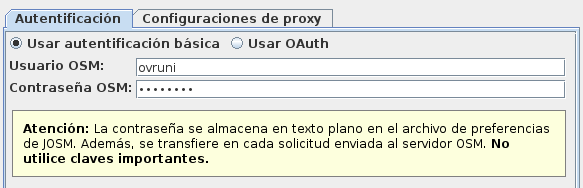
Autenticación básica
La autenticación básica es el mecanismo básico para autenticarse en el servidor de OSM.
Aquí hay una captura de pantalla del panel de preferencias para la autenticación básica:
Para utilizar la Autenticación Básica
- Ir a la ficha de Autenticación en los Ajustes de Conexión
- Seleccione el método de autenticación llamado Autenticación Básica
- Introduzca su nombre de usuario de OSM y su contraseña de OSM
Advertencia!
La contraseña es almacenada en texto plano en el archivo de preferencias de JOSM.
Por otra parte, se transfiere sin cifrar en cada solicitud enviada al servidor de OSM.
No utilice claves valiosas.
Autenticación basada en OAuth
OAuth is an open protocol to allow secure API authorization in a simple and standard method from desktop and web applications. The OSM server supports OAuth in addition to basic authentication.
OAuth has two major advantages over basic authentication:
- Your OSM password doesn't have to be saved in clear text in the JOSM preferences file.
- Your OSM password has to be transferred only once over the Internet, in contrast to basic authentication where your OSM password is transferred as part of every request sent from JOSM to the OSM server.
Warning!
Currently, the OSM server doesn't offer a secure communication channel. Even if you use OAuth your password is therefore transferred once in clear text over the Internet. Do not use a valuable password until the OSM server provides a secure communication channel (HTTPS).
For advanced users, OAuth has additional advantages:
- With OAuth you can generate restricted Access Tokens which you given somebody else such that another mapper can act on your behalf. For instance, a mapper could generate an Access Token which grants somebody else the right to download its private GPS traces. Even if he gives this Access Token to somebody else, his OSM password is kept private. In addition, he can revoke the special Access Token at any time. JOSM supports this kind of advanced configuration in the OAuth Authorisation Wizard with the authorisation procedure Manual authorization.
To use OAuth based Authentication
- In the Connection Preferences go to the tab Authentication
- Select the authentication method OAuth based authentication
- Click on Authorise now to launch the OAuth Authorisation Wizard (see screenshot below)
This will launch the OAuth Authorisation Wizard. Use one of the available authorization procedures in this dialog to get a valid Access Token.
JOSM displays the retrieved Access Token in the preferences panel (see screenshot below):
Deselect the checkbox Save to preferences if you don't want to save the Access Token in the JOSM preferences. If you don't save it the Access Token will be lost when you close JOSM. If you later startup JOSM again you will have to retrieve a new Access Token to work with OAuth based authentication again.
Click on Test Access Token to submit a test request with the token to the OSM server. JOSM will analyse whether this token is authorized to access the OSM server.
Click on New Access Token to generate a new Access Token.
Advanced OAuth parameters
Select the checkbox Display Advanced OAuth parameters to display the important OAuth parameters
- the Consumer Key and the Consumer Secret identifying JOSM as OAuth consumer
- the Request Token URL where JOSM can retrieve Request Tokens
- the Access Token URL where JOSM can retrieve Access Tokens
- the Authorise URL where JOSM users are redirected to to authorise a Request Token
Proxy Settings
JOSM communicates with the OSM server using the Hypertext Transfer Protocol (HTTP). If required it can relay its requests through a HTTP proxy or a SOCKS proxy.
- Go to the tab Proxy settings in the Connection Preferences
- Select one of the available options and enter additional configuration parameters
- Save the preferences

Using the standard system proxy
If you always want to use the proxy defined as standard proxy on your computer you have to start up JOSM with a special command. The command line has to include the parameter -Djava.net.useSystemProxies=true, for instance
java -Djava.net.useSystemProxies=true -jar josm.jar
Volver a Preferencias
Volver a Ayuda principal
Attachments (9)
- usar-url-api-defecto.png (8.5 KB ) - added by 15 years ago.
- usar-url-api-personalizada.png (9.0 KB ) - added by 15 years ago.
- autenticación-básica.png (14.7 KB ) - added by 15 years ago.
- preferencias-proxy.png (24.4 KB ) - added by 15 years ago.
- preferencias-oauth-paso-1.png (12.7 KB ) - added by 15 years ago.
- preferencias-oauth-paso-2.png (24.7 KB ) - added by 15 years ago.
- oauth-avanzado.png (24.7 KB ) - added by 15 years ago.
- oauth-authentication.png (85.2 KB ) - added by 10 years ago.
- proxy-settings.png (83.7 KB ) - added by 10 years ago.
Download all attachments as: .zip