| Version 4 (modified by , 15 years ago) ( diff ) |
|---|
Інші мови:
Файл > Надіслати данні на сервер
 Клавішна комбінація:
 Ctrl-Shift-U
Надіслати дані про нові, змінені та вилучені об’єкти з поточного шару на сервер.
Гео дані, що редагуються в JOSM, доступні тільки локально для користувача, який їх ввів, до тих пір, доки він не вирішить зробити їх доступними для спільноти. Для цього потрібно щоб користувач надіслав їх. Надсилання означає, що гео дані передаються на центральний сервер OSM, де вони інтегруються з гео даними інших користувачів в централізованій базі даних. Таким чином надіслані локальні гео дані стають частиною публічної мапи та можуть використовуватись іншими членами спільноти OSM.
Будь ласка, будьте обережні із редагуванням та надсиланням даних. Якщо у вас є сумніви, що до того що все добре, утримуйтесь від надсилання даних та збережіть їх на локальний жорсткий диск, перевірте те що потрібно і після цього спробуйте надіслати дані ще раз пізніше.
Набори змін, запити на надсилання та стратегія передачі даних
Гео дані передані на сервер OSM складаються з точок, ліній та зв’язків. Так як тисячі учасників публікують свої дані на сервері OSM, дуже важливим є опис того хто, що і в якому контексті зробив. Це було б дуже виснажуючим давати опис кожній окремій точці та лінії, які публікують учасники. Більш зручним є гуртування їх у пакунки зв’язаних об’єктів та опис усього пакунка на відміну від опису поодиноких окремих об’єктів.
В проекті OSM такі пакунки називаються наборами змін. Набір змін — являє собою об’єднання пов’язаних змін (нових об’єктів, змін чи вилучення існуючих об’єктів), що застосовуються до даних OSM.
Набори змін відрізняються від запитів на надсилання. Набір змін є логічним гуртуванням об’єктів, на відміну від запиту на надсилання, що є тільки технічним гуртуванням гео даних, що передаються до центрального сервера OSM. В JOSM ми кажемо, що об’єкти надсилаються використовуючи запити на надсилання до наборів змін. Діалог надсилання змін в JOSM дозволяє налаштовувати параметри запитів на надсилання та наборів змін об’єктів. Певні параметри є обов’язковими (отже користувачу потрібно налаштувати їх до надсилання даних на сервер), а більшість інших — додатковими, тому JOSM працює з відповідними типовими значеннями.
Гео дані можуть бути отримані пізніше через набір змін, в якому вони були надіслані, але не через запит на надсилання, що використовувався для цього. Набори змін мають унікальні ідентифікатори, запити на надсилання — ні. Наприклад: цей набір змін містить гео дані з обведення ортофотознімків міста Берн, Швейцарія. Але, не можливо побачити запит на надсилання, який використовувався для його заповнення.
Один запит на надсилання на один набір змін
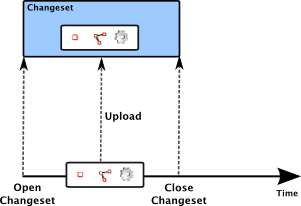
Це є найпростішим випадком, коли використовується лише один запит на надсилання для заповнення одного набору змін:
Це є стандартним налатуванням в JOSM. Таке налаштування краще всього підходить
- для користувачів, які надсилають результати конвертування кількох GPS треків в гео дані OSM
- для користувачів, які надсилають результати креслення по аерофотознімках, зроблені за кілька годин роботи
- для користувачів, які надсилають результат внесення інформації з місцевості про назви вулиць, цікаві місця (POI) та т.і.
Кілька запитів на надсилання до одного набору змін
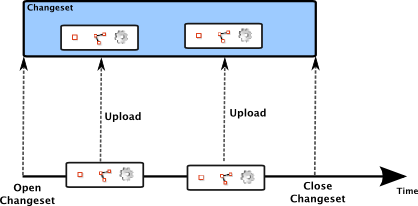
Це є більш вдосконаленим налаштування, що не потрібне більшості користувачів. Воно може стати в нагоді:
- для користувачів, які креслять у кількох шарах даних в JOSM та бажають надіслати результати своєї праці до одного набору змін
- для користувачів, які надають перевагу довгим сесіям роботи з мапою. Для них є більш безпечнішим надсилати проміжні результати роботи на сервер, ніж надсилати результат тільки по закінченню сесії. У такому випадку вони можуть використовувати кілька надсилань до одного набору змін, що дозволяє уникати фрагментування їх даних у непов’язаних між собою наборах змін.
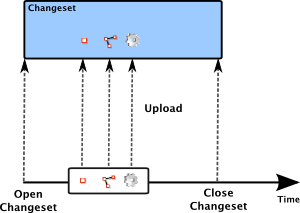
JOSM все ще підтримує можливість надсилання кожного об’єкту окремо.
Варто зауважити, що це вже є застарілою функцією, що лишилась у спадок. До недавнього часу це був єдиний варіант надсилання даних в OSM. Технічно, використовується дещо інший підхід до спілкуватися з сервером OSM. Це все ще доступно у JOSM, хоча сервер OSM підтримує запити на надсилання до 50 000 об’єктів. Для випадкових та звичайних користувачі ця можливість є застарілою. У рідкісних випадках, це може бути корисно для досвідчених користувачів.
Надсилання великих наборів даних у кілька наборів змін
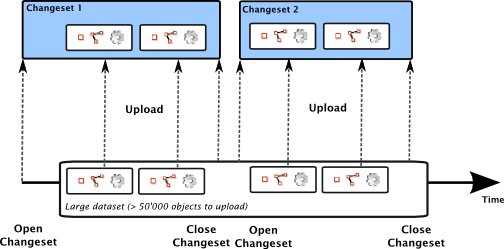
JOSM також підтримує надсилання великих наборів даних, о не вміщаються у один набір змін.
Ця додаткова функціональність корисна тільки для досвідчених користувачів. Вони можуть вибрати це налаштування у разі потреби надіслати набір даних, який перевищує 50 000 нових, змінених чи вилучених об’єктів.
Choosing your upload strategy - when and how often to upload
There is no simple answer to the question when and how often to upload. You neither should edit the whole day and then upload everything at once nor upload every minute after adding a way.
Here are some rules of thumb:
- Time required to upload: the smaller the upload requests you choose the longer it takes to upload. It takes more time to upload 100 objects using 100 individual upload requests than to upload them in one request containing 100 objects.
- Collisions with other mappers: if you upload 30,000 objects in one request and if the server encounters a problem on the 29,999th object the whole upload is rolled back. The problem has to be fixed first (i.e. by resolving a conflict). The whole 30,000 objects will then have to be uploaded again. On the other hand, if you upload 30,000 objects with 10 requests containing 1,000 objects each and the server encounters a problem on the 29,999th object then you only have to repeat the last upload request for the 29,000th to 30,000th objects. Objects 1-28,999 are already successfully uploaded. If you're mapping in areas where other mappers are active too you should therefore prefer smaller sizes for upload requests.
Uploading data
Launching the Upload Dialog
Checks before the Upload Dialog is displayed
If the Validator plugin is installed, JOSM performs a quick check on the data. If it finds warnings or errors you'll be presented with a list of them and get the chance to correct the problems and try again or upload anyway. It's not necessary to fix all of that, but please don't go over it easily, especially not the errors.
JOSM also checks for limitations imposed by the OSM server:
- tag names and tag values must be shorter than 255 characters
- ways can't consist of too many nodes
If the objects you're uploading have cyclic dependencies (relation 1 refers to relation 2, relation 2 refers to relation 3, relation 3 refers to relation 1) JOSM can't upload them. JOSM will ask you to break up these dependencies first.
Note: On large datasets these checks can take some time and for the time being they don't provide user feedback. Please be patient if it takes a couple of seconds to launch the Upload Dialog on large datasets. This will be fixed soon.
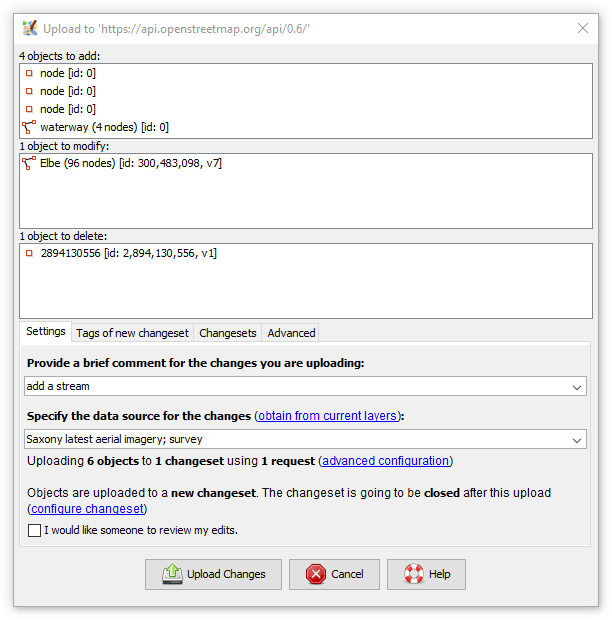
The Upload Dialog
The upload dialog consists of two sections:
- the upper half displays a summary of the objects to be added, to be modified, and to be deleted on the server
- the lower part provides panels for configuring various aspects of the upload process
When the Upload Dialog is launched it always displays the basic configuration panel which includes a text box for entering an upload comment and a summary of the other upload parameters for this upload.
Running a simple upload
- Launch the Upload Dialog
- Enter an upload comment. You must provide an upload comment of at least 3 characters.
- Click on
 Upload Changes
Running an upload with advanced options
Adding tags to the changeset
Geo data uploaded to the OSM server is always uploaded to a changeset. Similar to nodes, ways, and relations one can assign tags to a changeset.
In the Upload Dialog one can enter tags in the Tag Configuration Panel, see screenshot below:
Do's and Don'ts
- Tags are your friends. Use them to describe the geo data you are uploading to the OSM server.
- Use the tag
sourceto describe the source of your geo data (examples:traced from Yahoo Imagery,based on GPS traces and surveyed by bike). - You don't have to add your user name to the tags. The link between the changeset and your OSM user account is maintained automatically.
Note that the required upload comment is also a tag. You can either enter it in the Tag Configuration Panel with the key comment or in the Basic Settings Panel in the text input field provided there.
Choosing the changeset to upload to
In the Changeset Configuration Panel you can select what changeset the data is uploaded to, see the screenshot below:
JOSM uploads to a new changeset if Upload to a new changeset is selected. This is the standard setting.
If you want to upload to an existing changeset you have to select one of the available changesets from the drop down list. This list is only enabled if there are open changesets which you can upload data to because you own them. Click on  Refresh to load the list of available open changesets from the server. If there is at least one open changeset available you can select the radio button Upload to an existing changeset and select a changeset.
Click on  Close Changeset to close the currently selected open changeset. This is for convenience only. You don't have to close a changeset here in order to run a successful upload.
After a successful upload JOSM can either close the changeset used or leave it open for another upload. The default setting is to close it. You can configure whether JOSM should leave it open by unselecting the checkbox Close changeset after upload.
Configuring the number and size of upload requests
JOSM uploads geo data with one or more upload requests to a changeset on the OSM server. In the Advanced Configuration Panel you can decide about the number and the size of upload requests, see screenshot:
Select Upload data in one request to upload all object in one request. If you're uploading a medium to large number of objects this might take some time and JOSM will not be able to inform you about the progress. There are only two outcomes of such an upload: the upload either succeeded or it didn't. In the former case everything is fine, in the later no objects at all have been uploaded. This kind of upload will never lead to a partial upload which is both its strength and its weakness. It can be its weakness if the entire upload fails because there is a problem in the very last object in the upload request.
Select Upload data in chunks of objects to upload the objects in a sequence of requests with a predefined size. You can enter a preferred size for an upload request (called the "chunk size"). Depending on its value JOSM will submit a number of upload requests (the number is displayed on the right of the input field for the "chunk size"). In contrast to the former option, every upload of a chunk can either succeed or fail. You will get some coarse grained progress feedback because JOSM will inform you when an individual chunk has been uploaded successfully or when its upload has failed. Uploading in chunks is in most cases slower than uploading in one requests, though.
Select Upload each object individually to upload each object with an individual upload request. You will get very fine grained progress feedback because JOSM will inform you when an individual object was uploaded successfully or when its upload has failed. Note that this option is in most cases the slowest option.
Recommendations
- For small (<1,000 objects) to medium upload sizes (<5,000 objects), choose Upload data in one request
- For medium to large upload sizes (> 5,000 objects) choose Upload data in chunks of objects. A chunk size of 1,000 is a good value to start with.
- Don't use Upload each object individually unless you have a specific reason to do so. This is basically a legacy strategy from former versions of the OSM server.
Running a very large upload
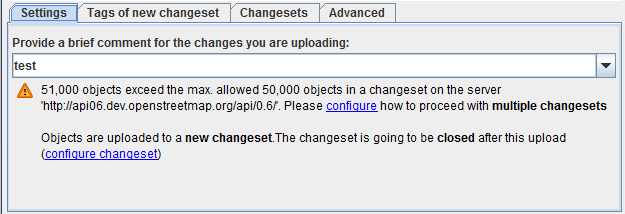
An upload is considered to be very large if its size exceeds the maximum size of a changeset on the OSM server. Currently, the upper limit for the size of a changeset is 50,000 objects and if JOSM detects that your upload is bigger it displays the following information in the Upload Dialog:
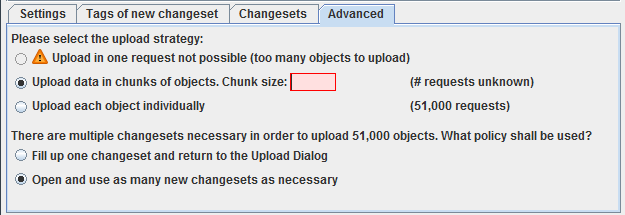
The warning message indicates that JOSM can't upload the data unless you configure some advanced settings. Either switch to the tab Advanced or click on the link in the message. The following configuration panel will be displayed:
For very large uploads, uploading in one request isn't possible and the respective option is therefore disabled. Please select a chunk size to be used in the upload. It has to be smaller than 50,000, too, because the upper limit for the size of a changeset also applies to the chunk size. You can upload a very large dataset with an individual request per object but you're not recommended to do so.
A very large upload doesn't fit within a single changeset. Please select
- whether JOSM should automatically open as many new changesets as required to upload the data. Select this option if you want to run a very large upload without user intervention.
- whether JOSM should fill up one changeset and return to the Upload Dialog. Select this option if you want to have full control over the changesets created for the upload.
Error and Warning messages
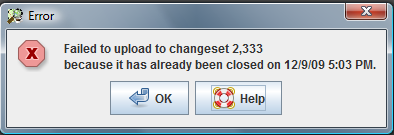
Uploading to a closed changeset
If you upload to an open changeset, the upload may fail because the changeset has been closed in the meantime. It could have been closed by the server because of a timeout (changesets don't stay open for more than 24 hours and are also closed after an hour of inactivity) or because you closed it explicitly in another JOSM instance.
JOSM displays the following error message:
How to resolve
- Launch the Upload Dialog again
- Select another open changeset or select to upload to a new changeset
- Upload again
Changeset becomes full during upload
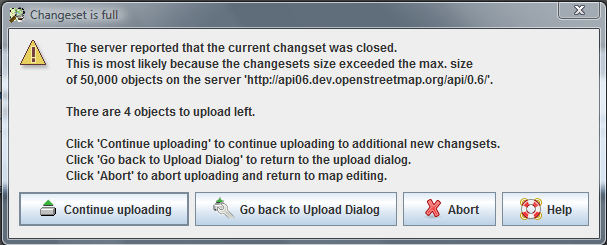
There is an upper limit for the size of changesets. On the OSM server it's currently set to 50,000 objects per changeset. An upload may exceed this limit while uploading, mainly if you are uploading a sequence of upload requests to the same changeset.
If JOSM detects that a changeset became full it displays the following warning message:
How to resolve
- Click on Continue Uploading to continue the upload with as many new changesets as necessary.
- Click on Go back to Upload Dialog to go back to the upload dialog. There you can select another changeset to upload the remaining objects to.
- Click on Abort to abort uploading and return to the main map editing interface.
Deleting nodes that are still in use
If your upload includes a deleted node the OSM server checks if the node is still used in one of the ways known to the server. You have to make sure that the node is isolated (not part of any way and not referred to by any relation) before it can be deleted.
If the OSM server detects that the node is still in use it replies an error message which JOSM displays as follows:
If you click on Prepare conflict resolution JOSM supports you in resolving the issue. First it downloads all ways in which the node is still used and merges them with your current dataset. In most cases, JOSM removes the deleted node from all parent ways automatically. If for some reason this isn't possible, JOSM creates a conflict which you have to resolve manually.
After that, just upload again. Your upload now includes all parent ways of the deleted node and the deleted node is removed from all of them. The upload should therefore succeed.


