

| Version 1 (modified by , 14 years ago) ( diff ) |
|---|
Revision parameter missing. Current base revision is 37
Andere talen:
- Ελληνικά
- English
- Esperanto
- español
- français
- 日本語
- norsk bokmål
- Nederlands
- русский
- українська
OAuth-assistent voor autorisatie
OAuth in een notendop
OAuth is een open protocol om veilige autorisatie voor API mogelijk te maken op een eenvoudige en gestandaardiseerde methode vanaf desktop en webtoepassingen.
Bij standaard gebruik - houd uw wachtwoord voor OSM privé
Het standaard gebruik in OSM is voor OAuth om uw wachtwoord voor OSM meer privé te houden dan met Basis-authenticatie.
OAuth heeft twee belangrijke voordelen op basis authenticatie:
- Uw wachtwoord voor OSM hoeft niet in heldere tekst te worden opgeslagen in het voorkeurenbestand van JOSM.
- Uw wachtwoord voor OSM behoeft slechts eenmaal versleuteld te worden overgedragen over het internet via
een veilige verbinding, in tegenstelling tot de basis authenticatie waarbij uw wachtwoord, als deel van elk verzoek dat wordt verzonden vanuit JOSM, in heldere tekst wordt overgedragen aan de server van OSM.
In terminologie van OAuth: een gebruiker van JOSM autoriseert JOSM om toegang te krijgen tot de server van OSM ten dienste van de gebruiker. Gedurende het autorisatieproces behoeft het wachtwoord voor OSM nooit ergens te worden ingevoerd in een dialoogvenster van JOSM als de gebruiker JOSM niet volledig vertrouwt (tenzij men dat wil om redenen van gebruik zie hier). In plaats daarvan geeft de server van OSM server een Toegangstoken uit dat JOSM presenteert aan de server van OSM als het gegevens upload ten dienste van de gebruiker. Toegangstokens onthullen niet het wachtwoord van de gebruiker en zij kunnen op elk moment worden ingetrokken.
Bij gevorderd gebruik - toegang delegeren aan andere mappers
Een meer gevorderd gebruik van OAuth is om toegang te delegeren met uw account voor OSM aan andere mappers. OAuth staat u toe om een andere gebruiker, indien nodig, beperkte toegang te geven tot uw account.
Voorbeeld: Mapper A kan mapper B het recht toekennen om zijn privé GPS-sporen te downloaden vanaf de website van OSM. Mapper A zou een OAuth Toegangstoken genereren en dat beperken tot het privilege "Download mijn privé GPS-sporen". Mapper A zou dan een e-mail met het Toegangstoken aan Mapper B verzenden. B kan het Toegangstoken in JOSM invoeren en is nu gerechtigd om de privé GPS-sporen van A te downloaden vanaf de server van OSM. B zou echter niet gerechtigd zijn om gegevens op naam van A te uploaden en kent het wachtwoord van A voor OSM niet. A kan op elk moment het Toegangstoken dat is uitgegeven aan B in te trekken.
De OAuth-assistent voor autorisatie
What does authentication/authorisation mean?
When you upload geodata to the OSM server you have to tell the server who you are. The OSM server will identify every uploading mapper by asking for an OSM username. The OSM server furthermore needs to authenticate this identity, i.e. to reliably determine whether the mapper is indeed the claimed user. For this purpose, it asks for a password in addition to the username. The server's assumption is that whoever knows the secret password for username xyz is reliably authenticated to be xyz. A mapper logged in with an authenticated username and password is entitled to run a broad range of operations on the server. The mapper is authorised to upload data, to create changesets, to close changesets, to upload GPS traces, to read and changes personal preferences on the server, to invite others as friends, to send emails to other accounts, etc. Currently, it isn't possible to create an OSM account with an OSM username and a password with restricted rights, i.e. an account that would only be able to upload GPS traces, but not map data. Whoever has successfully authenticated with an OSM username and an OSM password is fully authorised to do everything an OSM user can normally do on the server.
This is where OAuth comes into play: OAuth allows you to authorise somebody else to act in a restricted way on your behalf. Instead of giving away your OSM username and your OSM password, which would fully entitle the recipient to act on your behalf at the OSM server, you only give away a "ticket" on which the granted rights are listed. This ticket is called an Access Token. Restrictions applied to an Access Token include:
- an Access Token is only valid for a specific client (called a Consumer in OAuth terminology), i.e. only for JOSM, but not for OpenStreetBugs
- an Access Token is only valid for specific operations, i.e. only for uploading GPS traces, but not for uploading map data
- an Access Token could only be valid for a certain time, i.e. only today, but this is not yet supported by the OSM server
In addition to username/password pairs, the OSM server also accepts OAuth Access Tokens to authenticate and authorise a user. More specifically, it accepts requests signed with such a token, but this is beyond of the scope of this online help.
The OAuth Authorisation Wizard allows you to receive a valid OAuth Access Token, provided that you have an OSM username and OSM password, or to enter and use an OAuth Access Token in JOSM, provided that you got one from somebody else who has an OSM username and an OSM password.
Fully automatic authorisation process
The easiest way to get an Access Token is to let JOSM fully automatically retrieve one from the OSM server.
- Step 1/3 - Open the preferences dialog
Click on the Preferences button in the toolbar. In the dialog, select the Connection Setting tab.
- Step 2/3 - Get the Access Token
Enter your OSM username and your OSM password and click on Authorise now.

- Step 3/3 - Accept the Access Token
JOSM displays the retrieved Access Token. Click on Accept Access Token to accept it.

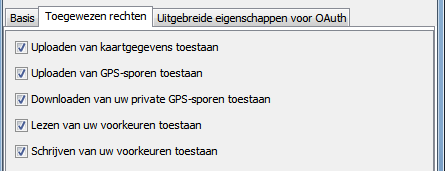
Restricting the granted privileges
When JOSM fully-automatically requests and authorises an Access Token, it grants it five privileges:
- the right to upload data to the OSM server
- the right to upload GPS traces to the OSM server
- the right to download private GPS traces from the OSM server
- the right to read the preferences stored on the OSM server
- the right to write preferences stored on the OSM server
These are the default settings. If you want to restrict the granted privileges:
- Click the tab Granted rights
- Deselect each privilege which should not be granted to the requested Access Token

Advanced OAuth parameters
When JOSM fully-automatically requests and authorises an Access Token, it uses default values for the OAuth parameters. Advanced users may want to change these parameters
- in order to use a different Consumer Token (consisting of a Consumer Key and a Consumer Secret). This allows you to create your own Consumer Token for JOSM and then use it in JOSM.
- in order to use it on a different than the standard OSM server. For instance, this allows users to use OAuth with an OSM development server or with a local installation of the OSM server application.
In order to edit the Advanced OAuth parameters
- Click the tab Advanced OAuth parameters
- Deselect the checkbox Use default settings
- Enter your values for the five OAuth parameters

Semi-automatic authorisation process
You can also retrieve an Access Token semi-automatically. If you use this process you have to use both dialogs in JOSM and the OSM website launched in an external browser to create and authorise the Access Token. In contrast to the fully automatic process you never have to enter your OSM username or your OSM password into a JOSM dialog. This process is therefore suitable for a user which - for whatever reason - never wants to use their OSM password outside of the secure login page of the OSM website. The fully automatic process runs exactly the same steps that would run manually in the semi-automatic process, just without your intervention.
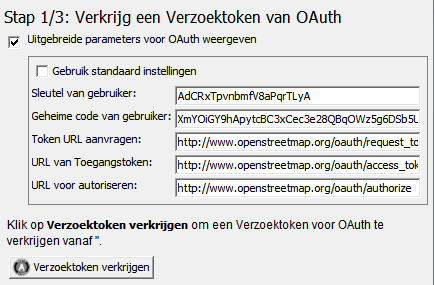
- Step 1/3 - Get the Request Token
Click on Retrieve Request Token to retrieve an OAuth Request Token.

- Step 2/3 - Authorise the Request Token in an external browser
JOSM now launches an external browser with the OSM website. Please login and follow the instructions. Then switch back to the OAuth Authorisation Wizard and click on Retrieve Access Token.

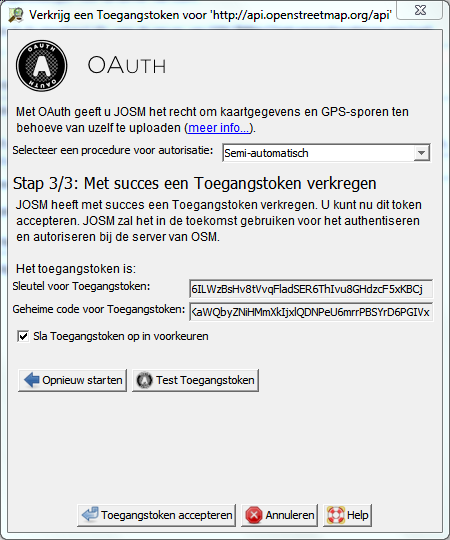
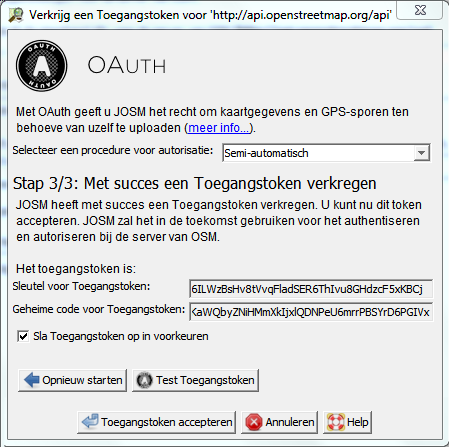
- Step 3/3 - Accept the Access Token
JOSM displays the retrieved Access Token. Click on Accept Access Token to accept it.

Advanced OAuth parameters
When JOSM semi-automatically requests and authorises an Access Token, it uses default values for the OAuth parameters. Advanced users may want to change these parameters
- in order to use a different Consumer Token (consisting of a Consumer Key and a Consumer Secret). This allows you to create your own Consumer Token for JOSM and then use it in JOSM.
- in order to use it on a different than the standard OSM server. For instance, this allows users to use OAuth with an OSM development server or with a local installation of the OSM server application.
In order to edit the Advanced OAuth parameters
- Select the checkbox Display Advanced OAuth Parameters
- Enter your values for the five OAuth parameters

Manual authorisation process
The manual authorisation process allows you to enter an arbitrary Access Token. You can use this process
- to enter an Access Token you have kept in a secure place, for instance in a secure store for credentials
- to enter an Access Token you have received from somebody else, for instance from another mapper who granted you restricted account access
- Step 1/1 - Enter the Access Token and accept it
Enter the Access Token and click on Accept Access Token.

===============
Op OAuth gebaseerde authenticatie
De server van OSM ondersteunt OAuth in aanvulling op de basis authenticatie.
Op OAuth gebaseerde authenticatie gebruiken
- In Verbindingsinstellingen, ga naar de tab Authenticatie
- Selecteer de authenticatiemethode OAuth gebaseerde authenticatie
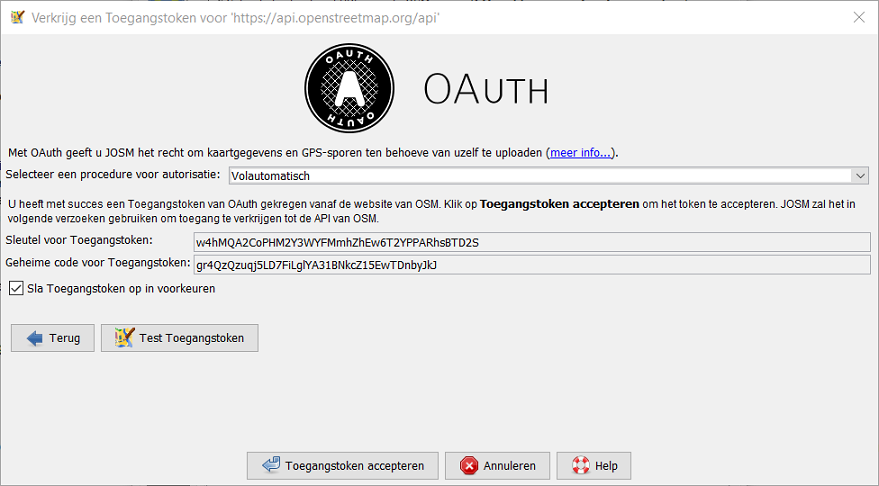
- Klik op Nu autoriseren om de OAuth Autorisatie Wizard te starten (zie schermafdruk hieronder)

Dit zal de OAuth Autorisatie Wizard starten. Gebruik één van de beschikbare authorisatieprocedures in dit dialoogvenster om een geldig Access Token te verkrijgen.
JOSM geeft het gevonden Access Token weer in het paneel van de voorkeuren (zie schermafdruk hieronder):
Deselecteer het keuzevak Save to preferences als u het Access Token niet wilt opslaan in de voorkeuren van JOSM. Als u het niet bewaart zal het Access Token verloren gaan als u JOSM afsluit. Als u later JOSM opnieuw start zult u een nieuw Access Token moeten ophalen om opnieuw met op OAuth gebaseerde authenticatie te werken.
Klik op Test Access Token om een testverzoek door te voeren met het token naar de server van OSM. JOSM zal analyseren of dit token geautoriseerd is om toegang te krijgen tot de server van OSM.
Klik op New Access Token om een nieuw Access Token te genereren.
Gevorderde parameters voor OAuth
Selecteer het keuzevak Display Advanced OAuth parameters om de belangrijke parameters voor OAuth weer te geven
- de Consumer Key en de Consumer Secret identificeren JOSM als een gebruiker van OAuth
- de Request Token URL waar JOSM Request Tokens kan ophalen
- de Access Token URL waar JOSM Access Tokens kan ophalen
- de Authorise URL waarnaar gebruikers van JOSM worden geleid om een Request Token te autoriseren
Proxy-instellingen
JOSM communiceert met de server van OSM met behulp van het Hypertext Transfer Protocol (HTTP). Indien vereist kan het zijn verzoeken leiden langs een HTTP proxy of een SOCKS proxy.
- Ga naar de tab Proxy settings in de Verbindingsinstellingen
- Selecteer één van de beschikbare opties en voor aanvullende parameters in voor de configuratie
- Sla de voorkeuren op

Gebruiken van de standaard systeemproxy
Indien u altijd de proxy wilt gebruiken die is gedefinieerd als standaard proxy op uw computer moet u JOSM opstarten met een speciale opdracht. De opdrachtregel moet de parameter -Djava.net.useSystemProxies=true bevatten, bijvoorbeeld
java -Djava.net.useSystemProxies=true -jar josm.jar
Gebruiken van de handmatig geconfigureerde proxy
Indien er geen noodzaak is voor persoonlijke authenticatie voor uw proxy, onthoud dan om het NT-domein in uw gebruikersnaam op te nemen, bijv. domein\gebruikersnaam. Dit probleem vindt zijn oorsprong in de implementatie van de proxy in java.net.HttpURLConnection.
Advanced OAuth parameters
Attachments (10)
- fully-authomatic-1.png (47.4 KB ) - added by 14 years ago.
- fully-authomatic-privileges.png (9.6 KB ) - added by 14 years ago.
- fully-automatic-advanced.png (9.8 KB ) - added by 14 years ago.
- semi-automatic-step-1.png (37.2 KB ) - added by 14 years ago.
- semi-automatic-step-2.png (54.9 KB ) - added by 14 years ago.
- oauth-preferences-step-3.png (53.0 KB ) - added by 14 years ago.
- manual.png (40.8 KB ) - added by 14 years ago.
- semi-automatic-advanced.png (14.0 KB ) - added by 14 years ago.
- semi-automatic-step-3.png (45.8 KB ) - added by 14 years ago.
-
fully-authomatic-2.png
(137.4 KB
) - added by 6 years ago.
adjusted size to 90%
Download all attachments as: .zip