

| Version 19 (modified by , 10 years ago) ( diff ) |
|---|
Languages:
Create Areas By Extrusion
 Keyboard shortcut:
 X
Replaces the segment of a  way between two
  nodes with up to three way segments, one of which is parallel to the original.
Table of Contents
Basic usage
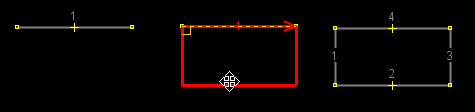
Click on a way segment and drag it. There are up to 3 possible directions - at right angle to the original position and along its neighboring segments. The chosen reference segment will be indicated.

Note: In certain cases new nodes will not be created. Specifically, if new segment is just lengthening of the old one. However, the node will not be moved when it's part of another way, as to not affect the other way.
Tip: If you start with just a single line segment, you will get a rectangle.

Insert node
A double click at a way segment inserts a new node.
Move node
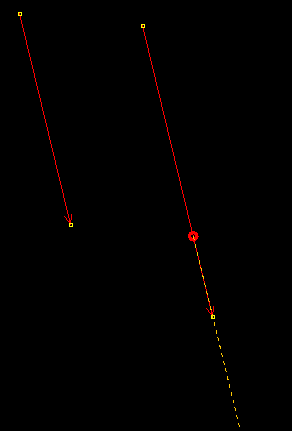
Ctrl+click on a node and drag it along one segment. Possible directions are directions of all way segments connected to the node.

Dual alignment
Toggled by X or the  item in the Edit menu. Instead of using one reference segment and moving both nodes of the selected original segment in the same direction,
this mode uses two reference segments (neigbors of the original segment) and moves the nodes each according to its own reference segment.
item in the Edit menu. Instead of using one reference segment and moving both nodes of the selected original segment in the same direction,
this mode uses two reference segments (neigbors of the original segment) and moves the nodes each according to its own reference segment.

The status is indicated in the status line and visually (two reference segments shown instead of one).
Modifiers
Shift
 Always create nodes, even if new segment is just lengthening of the old one.

Alt
 Don't alter original way, create new way instead. Ways will share the two nodes.

Ctrl
 Move segment in parallel. Nodes are moved even if they are connected to other ways.

Move a node along line.

Customization
- Color of main line: Defaults to
selectedcolor, but can be changed with advanced preferencecolor.extrude.main.line. - Stroke of main line:
extrude.stroke.main. Parameters:<width>for solid line (width in pixels),<width> <dashlength> <spacelength>for dashed line. - Stroke of old line (used while moving segment):
extrude.ctrl.stroke.old-line(stroke parameters). - Color of helper line:
Extrude: helper linein colors settings. - Stroke of helper line:
extrude.stroke.helper-line(stroke parameters). - Size of right angle helper symbol:
extrude.angle-symbol-radius(pixels). - Moving nodes without the need of pressing
Ctrl:extrude.drag-nodes-without-ctrl(boolean). - Ignoring shared nodes to avoid overlapping segments:
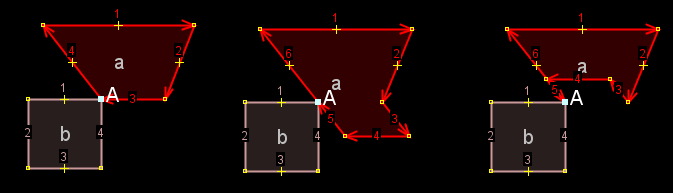
extrude.ignore-shared-nodes(boolean).
If enabled (default), nodes shared with other way(s) are left untouched and new node is created to facilitate the extrusion.
![Ignore shared nodes enabled[[br]] 1. original, 2. extrude from 1 downwards, 3. extrude from 1 upwards](/attachment/wiki/Help/Action/Extrude/IgnoreSharedNodes-enabled.png "Ignore shared nodes enabled[[br]] 1. original, 2. extrude from 1 downwards, 3. extrude from 1 upwards")
If disabled, shared nodes are still part of the way, segments might overlap.
![Ignore shared nodes disabled[[br]] 1. original, 2. extrude from 1 downwards, 3. extrude from 1 upwards](/attachment/wiki/Help/Action/Extrude/IgnoreSharedNodes-disabled.png "Ignore shared nodes disabled[[br]] 1. original, 2. extrude from 1 downwards, 3. extrude from 1 upwards")
- The extrude action will be performed only if the pointer moved more than specified distance:
extrude.initial-move-threshold(pixels, default 1). - Changing the keyboard shortcut of Dual alignment mode: Set
extrude.dualalign.toggleOnRepeatedXtofalseto disable the default one, set new one viaMode: Extrude Dual alignmentshortcut.
Back to Edit Toolbar
Back to Main Help
Attachments (12)
- BasicExtrudes.png (20.3 KB ) - added by 12 years ago.
- LineExtrude.png (1.6 KB ) - added by 12 years ago.
- MoveNode.png (9.1 KB ) - added by 12 years ago.
- Shift.png (3.6 KB ) - added by 12 years ago.
- Alt.png (3.1 KB ) - added by 12 years ago.
- Ctrl.png (20.0 KB ) - added by 12 years ago.
-
IgnoreSharedNodes-enabled.png
(10.3 KB
) - added by 11 years ago.
Ignore shared nodes enabled 1. original, 2. extrude from 1 downwards, 3. extrude from 1 upwards
-
IgnoreSharedNodes-disabled.png
(10.4 KB
) - added by 11 years ago.
Ignore shared nodes disabled 1. original, 2. extrude from 1 downwards, 3. extrude from 1 upwards
- DualAlign.png (10.2 KB ) - added by 11 years ago.
-
x_ctrl_leftmouse_drag.png
(616 bytes
) - added by 10 years ago.
you can also use this mode to extend or shink a line
-
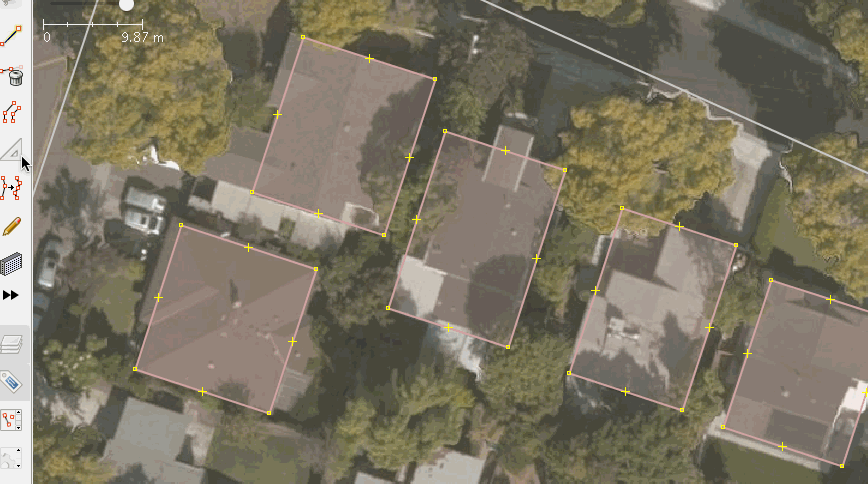
extrude-simple-mode-buildings.gif
(842.9 KB
) - added by 10 years ago.
https://github.com/mapbox/mapping/wiki/Advanced-mapping-guide#buildings https://github.com/mapbox/mapping/issues/162
- extrude-used-on-node.gif (61.6 KB ) - added by 10 years ago.
Download all attachments as: .zip