

| Version 21 (modified by , 8 months ago) ( diff ) |
|---|
Languages:
KindaHackedInUtils Plugin
This plugin contains several useful functions that are kind of hacked into JOSM. So they are in some way unconventional to the typical use of JOSM.
"Hijacked" Functions
This functions use existing modes of JOSM without the need to activate them.
| Keyboard shortcut | Description | Used JOSM function |
|---|---|---|
B
| When pressing B on the keyboard a new point will be created at the mouse location.
| This works like activating the draw mode and double clicking at the location the point should be created at. |
K
| When pressing K on the keyboard the way at the mouse location will be split at the mouse location.
| This works like activating the split mode and clicking at the location the way should be split. |
Add direction to objects with mouse pointing
Press H on the keyboard to add the direction value to the selected object.
What it does?
The function will add the key direction with a direction value to the selected object. The direction values is either a number of 0 to 359 degrees or the abbreviation of a degree number if the number matches that number. For some objects forward and backward are also used.
Alternative keys are used in following circumstances:
| Alternative key | Usage dependent on the selected object |
|---|---|
railway:signal:direction
| tag railway=signal is present
|
traffic_signals:direction
| tag highway=traffic_signals is present and selected node is part of a way
|
traffic_sign:direction
| key traffic_sign is present, the selected node is part of a way and the usage of this key is enabled in the preferences
|
light:direction
| tag highway=street_lamp is present
|
camera:direction
| tag manmade=surveillance is present
|
roof:direction
| key building or building:part is present or the selected node is part of such an object
|
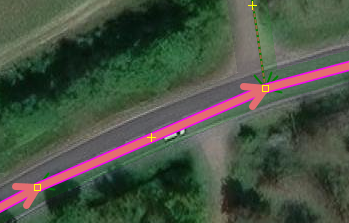
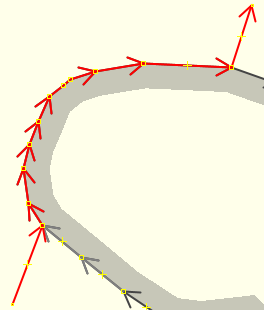
The direction depends on the mouse location relative to the selected object, the direction of the way the object is part of and if certain keys are present for the selected object when pressing H on the keyboard. If the key traffic_sign, the key/value highway=traffic_signals or railway=signal are present the direction value is handled like this:

If the mouse point anywhere inside the forward area in this image the the point in the middle which is a traffic sign or traffic signals will get the direction value of forward, if the mouse is in the backward area the direction value will be backward. If the mouse is hovering over the way segment A (in direction of the way) after the point in the middle it always will be forward, if the mouse is on the way segment B before the point in the middle it will always be backward.
The exception from those rules is if the direction value of forward or backward would be or could be ambiguous the degree value will be used instead.
If you want to get the direction value for traffic signs with pointing opposite to the front side of the signs instead of pointing to the direction the traffic sign is affecting you can disable Natural direction for traffic signs in the preferences which will only affect the degree values. If you prefer to switch out the forward and backward areas you can add an advanced preference key kindahackedinutils.oppositeSimpleDirection with the value true to the preferences. This preference will only work if Natural direction for traffic signs is disabled.
For example the sign in the middle is a speed limit sign, with the default settings you have to point to the way segment that is affected by the sign, so the way with the speed limit. If the advanced preference is set and Natural direction for traffic signs is disabled you will have to point to the way in front of the sign, so to the way that hasn't the speed limit.
If a simple direction is ambiguous for a selected traffic sign node a popup menu with the possible degree values is shown:

While hovering with the mouse over a menu entry the way segment that is affected by the sign is highlighted.
To force the usage of a degree value instead of forward/backward you can use the keyboard shortcut Alt+Shift+H
For traffic signs that are on a node that is part of a way it's possible to use traffic_sign:direction as the key for simple directions instead of direction with enabling the respective preference.
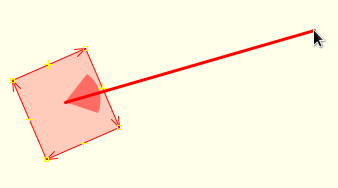
For adding roof:direction to buildings or direction to solar panels two options exist. First to select the building/solar panel, when pressing H the degree value will be calculated from the centroid/barycenter of the nodes of the selected building/solar panel. So you have to point the mouse to the wanted direction relative to the virtual middle point of the building/solar panel. Second option is to select one node of the building/solar panel, pointing the mouse relative to that point in the direction of the roof/solar panel and then pressing H. The resulting degree value will be added to the building/solar panel and the building/solar panel will be selected. If a point is shared by multiple buildings/solar panels a popup menu for the selection of the building/solar panel is shown:

The arrow shows the direction that will be added to the building/solar panel. When hovering over a menu entry the building/solar panel the direction will be added to is highlighted. After selecting an entry the building/solar panel the direction was added to is selected.
Detach nodes from areas
Select 
Detach nodes from ways and move them from the More tools menu or press Z on the keyboard.
What it does?
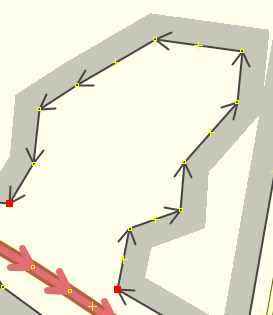
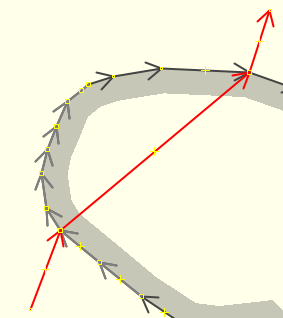
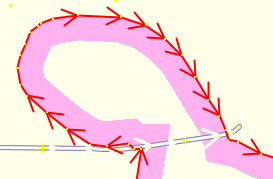
Sometimes areas are attached to a way which is typically wrong since the area doesn't reach up to the way line:

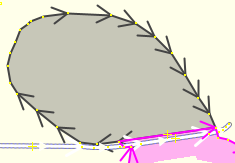
Here the areas are attached to the primary highway and the track and the curve is rather sloppy mapped. First add points to the primary highway to make the curve look better. Then select the primary highway and use the detach function, it will result in this:

The detach function will detach and move all points of areas that are attached to the selected way or if the area itself is selected detach and move all points of the area that are attached to ways. The movement of a point typically goes in the direction of the inside of the area but if the area is not a real area but a way that is part of a relation it might go wrong if the relation members are not present in the current edit layer.
Undo changes only for an object
Select 
Undo/redo changes on selected object from the More tools menu or press Ctrl+Alt+Shift+Z on the keyboard.
What it does?
Sometime you might want to undo an accidentally change of a single object after you've noticed the accident, so all changes to other objects that were done after the accident would be sustained.
To undo the changes of an object select the object or if it was deleted search for the deleted object for selection or copy the id of the deleted object from a newly downloaded layer.
If no object is selected the plugin will present you with a dialog to enter the id of the object to undo:

If an id is present in the clipboard it will be automatically entered as the wanted id. After pressing OK or if an object was already selected you will get the undo/redo dialog for the object:

Here you can select the change that should be undone/redone. The presented changes are all available undo command in which the object was included. Only when the object was deleted there might be missing some commands but those will be available after undoing the deletion of the object.
NOTE: This function will not check if the changes have already been undone/redone. So you have to know what to do.
Create or change turn restrictions
Select 
Create turn restriction or change selected from the More tools menu or press Shift+T on the keyboard.
What it does?
Sometimes turn restrictions were created wrong, like this:

To easily fix it select the existing turn restriction relation, then add the new to way to the selection and open the change turn restriction dialog:

Select the corrected restriction and press OK.
This works the same for new turn restrictions, first select the from way, then add the to way to the selection and open the create turn restriction dialog to select the type of the new turn restriction.
NOTE: This is not a replacement for turn restriction plugin, it just leaves out options to make changing existing turn restrictions faster.
Quickly add objects to existing relation
Select 
Add selected objects to selected relation from the More tools menu or press Ctrl+R on the keyboard.
What it does?
The selected objects will be added to the selected relation without showing a dialog. The relation the objects should be added to has to be selected as the first object. The roles will be guessed based on the type and keys of the relation and the selected objects
Quick Relation Selection List

 keyboard shortcut:
 Ctrl+Shift+Alt+R
Usage
Whenever an object is selected in JOSM the list will be filled with all relations the selected object is a member of.
When pointing with the mouse to a relation in the list all members will be highlighted in JOSM.
| Mouse action on relation in the list | effect of the mouse action |
|---|---|
| single left click | The relation will be selected in JOSM and the list will be filled with all relations the selected relation is a member of. |
| double left click | The relation will be selected in the list. |
| tripple left click | The relation will be selected in the list and the relation editor for that relation is opened. |
If selected objects are already members of the selected relation a dialog will be shown to select the objects that should be added to the relation again:

The objects can be selected by single left click or single left click dragging.
If you are sure that you want to add selected objects again and don't want to see the dialog you can use the keyboard shortcut Ctrl+Shift+R to directly add those objects to the selected relation.
NOTE: The Quick Relation Selection List will only be available after a restart of JOSM or by removing all layers.
Attachments (27)
- detach.svg (3.2 KB ) - added by 9 months ago.
- unredo_id.png (17.9 KB ) - added by 9 months ago.
- unredo_dialog.png (85.2 KB ) - added by 9 months ago.
- direction_side.png (19.4 KB ) - added by 9 months ago.
- wrong_turn_restriction.png (1.3 KB ) - added by 9 months ago.
- unredo.svg (10.6 KB ) - added by 9 months ago.
- sloppy_curve.png (97.3 KB ) - added by 9 months ago.
- better_curve.png (98.9 KB ) - added by 9 months ago.
- turn_restriction.png (60.1 KB ) - added by 9 months ago.
- relation-add.svg (6.0 KB ) - added by 9 months ago.
- ambigouse.png (20.8 KB ) - added by 9 months ago.
- roof-direction-from-node.png (32.1 KB ) - added by 9 months ago.
- quick-relation-selection-list.png (24.5 KB ) - added by 9 months ago.
- re-add-members-to-relation.png (46.1 KB ) - added by 9 months ago.
- visualization.png (13.1 KB ) - added by 8 months ago.
- create_area_1.png (27.0 KB ) - added by 7 months ago.
- create_area_select_type.png (24.9 KB ) - added by 7 months ago.
- create_area_2.png (30.4 KB ) - added by 7 months ago.
- wrap_around_1.png (23.7 KB ) - added by 7 months ago.
- wrap_around_2.png (24.0 KB ) - added by 7 months ago.
- wrap_around_3.png (20.3 KB ) - added by 7 months ago.
- fix_1.png (22.3 KB ) - added by 7 months ago.
- fix_2.png (20.3 KB ) - added by 7 months ago.
- fix_3.png (22.3 KB ) - added by 7 months ago.
- closeway.svg (4.3 KB ) - added by 7 months ago.
- wraparound.svg (5.4 KB ) - added by 7 months ago.
- newarea.svg (5.0 KB ) - added by 7 months ago.
Download all attachments as: .zip