

| Version 51 (modified by , 8 years ago) ( diff ) |
|---|
Table of Contents
Layer List Dialog
 Keyboard shortcut:
 Shift+Alt+L
List of currently loaded layers.

Showing and Hiding the Layer List Dialog Window
- Show or hide the Layer List Dialog Window by clicking on
 in the tool palette on the left of the JOSM main window.
- Show the Layer List Dialog Window by pressing
Shift+Alt+L. - Use the Windows menu.
Layer types
There are different types of layers. Each has a Context Menu accessed from the right mouse button which provides operations on the layer.
 OSM Data Layer (menu): holds the OpenStreetMap data (nodes, ways, relations).
 GPX Layer (menu): holds the GPS data loaded from your local hard disk (by using the open dialog to load GPX files) or from openstreetmap. The context menu (right mouse click on layer in layer list) allows to set special properties for different gps layers (different colors, line style, etc.).
 Marker Layer (menu): Markers are specially identified points on the track. They come in four varieties: simple named markers, audio markers, image markers and web markers. They are created as a side effect of opening a GPX file, containing waypoints from that file, or from a set of waypoints artificially constructed using the context menu entry Make Sampled Audio Layer on the GPX layer, which produces only audio markers.
 Photo Layer (menu): the context menu (right mouse) of a GPS layer provides the menu to import images. Using this feature allows to match digital images with the gps coordinates to ease the naming of streets (for example).
 Imagery Layer (menu): backgrounds retrieved from a WMS, TMS or WMTS server. Examples are Landsat satellite imagery, Bing Aerial, NPE out-of-copyright Ordnance Survey maps and OpenStreetMap map tiles. See also Imagery.
 Validator Layer (menu): highlights objects with errors or warnings from the Validator
 Notes Layer (menu): displays the position of downloaded Notes in the Map view.


There might be more layer types depending on the loaded plugins, e.g.  Mapillary plugin.
Layer Buttons
 click to make the layer the active layer
 click to snap/unsnap the zoom to native resolutions of this background imagery layer
 click to hide/unhide the layer


Panel Buttons
The Layer List Dialog also has several buttons at the bottom which operate on the selected layers:
Move Up
 Up moves the selected layers up one row in the layer stack.
This is important when items in one layer obscure those in layers below.
Move Down
 Down moves the selected layers down one row in the layer stack.
This is important when items in one layer obscure those in layers below.
Activate Layer
 Keyboard shortcut:
 Shift+A+[0-9] - counting from the top
Activate activates the selected layer.
It is only possible to edit in an active Data layer.
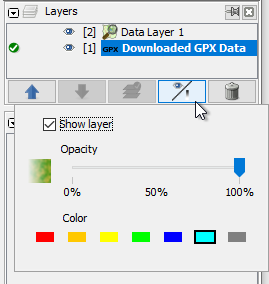
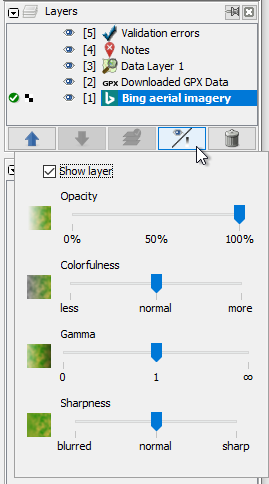
Visibility
 Once clicked on, it offers:
- A checkbox to show/hide a layer, i.e. turns visibility of selected layers on or off. The layers are unchanged when hidden, but their contents are not shown. You can also use the following shortcuts to show/hide a layer:
Shift+S+[0-9]- counting from the topAlt+[0-9]- counting from the bottom
- A bar to adjust the
 Opacity of selected layers in percent.
- A bar to adjust the
 Colorfulness of selected layers.
- A bar to adjust the
 Gamma of selected layers.
- A bar to adjust the
 Sharpness of selected layers.
Colorfulness, Gamma and Sharpness are only availible for imagery layers.
Delete Layer
 Delete permanently deletes the selected layers. All unsaved changes will be discarded!
If you try to delete OSM data layers which contain changes, JOSM will open the Unsaved Changes Dialog, asking to upload and/or save these changes.
Individual Buttons
There might be more buttons depending on the loaded plugins, e.g. ![]() RasterFilters plugin.
RasterFilters plugin.
Back to Toggle Dialogs
Back to Main Help
Attachments (2)
- gpx_colors.png (11.1 KB ) - added by 5 years ago.
- LayerList.png (20.9 KB ) - added by 5 years ago.
Download all attachments as: .zip